
Basic Configuration Steps
After installing Z and I Emulator for Web,
you need to configure Z and I Emulator for Web sessions for your users. To do this,
use the Deployment Wizard to create HTML files that define how users access session configuration information.
See Configuring Z and I Emulator for Web clients for information on using the Deployment Wizard to create HTML pages to launch Z and I Emulator for Web sessions.
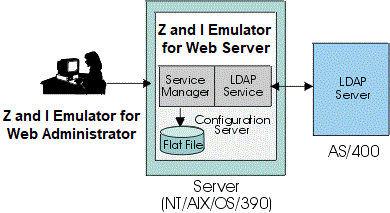
Configuring the Z and I Emulator for Web Configuration Server
If you are using the configuration server-based model or the combined model to create HTML pages in the Deployment Wizard, you must configure sessions on the configuration server. The configuration server is configured through the Administration Utility. Complete the following steps to define sessions in the configuration server:
- Open the Administration Utility.
On Windows NT, 2000, or XP, click Start > Programs > HCL Z and I Emulator for Web >
Administration > Administration Utility.
On other platforms, open admin.html in the ZIEWeb directory.
You can open the Administrator window from any computer that has
access to the Z and I Emulator for Web server.
- Logon.
The default user ID is admin and the password is password.
- Change your administrator password.
For security reasons, you should change the default administrator password.
- Click the Users/Groups.
- Right-click admin from the User List, and click Properties.
- Type the new password in the New Password box, and Confirm Password fields.
- Click OK.
 | At this point, you may want to enable
Z and I Emulator for Web to use Lightweight Directory Access Protocol (LDAP),
which allows for information sharing between Z and I Emulator for Web servers.
For instructions on how to setup and use this optional feature, click here. |
- Add groups.
Host sessions can be defined for groups. Using groups can significantly reduce administration
effort as all sessions defined for the group are available to all user IDs in the group.
- Click New Group.
- Type the Group ID. The first character must be a letter and you can use only A-Z, a-z,
0-9, . (period), and - (hyphen). Group IDs are converted to uppercase characters.
 |
Group IDs are not converted to uppercase when you are using LDAP. |
- Optionally, type a description of the group. Any character is allowed except | (vertical bar)
or # (number or pound sign).
- Optionally, select the users who are to be members of the group from the
Not a member of list.
|
If you are using LDAP, select the parent group from the
Subgroup of list.
|
- Click Add.
|
If you are using LDAP, skip this step. |
- Click Apply. Repeat steps 3 - 7 if you want to create another group.
- Click Close when you finish.
- Add users.
This step is only necessary if you are using the configuration server-based model.
Each user must have an ID to log on to Z and I Emulator for Web. This step describes how to create a user ID for each user. Optionally, if your users log on to a Windows domain, you can have the configuration server automatically create IDs for them based on their Windows usernames. This option is available through the Deployment Wizard, and does not require that you follow these steps to create user IDs.
- Click New User.
- Type the User ID. You can use only A-Z, a-z,
0-9, . (period), and - (hyphen). User IDs are converted to lowercase characters.
IDs must be unique. You cannot have a user ID and a group ID that are the
same, even if one is in lower case and the other is in upper.
|
User IDs are not converted to lowercase when you are using LDAP. |
- Optionally, type a description of the user. Any character is allowed except | (vertical bar)
and # (number or pound sign).
- Optionally, type a password and confirm it. Any character is allowed.
- Select one or more groups for the new user
from the Member of list.
A user must be a member of at least one group.
|
If you are using LDAP, a user can be a member of only one group.
|
- If you do not want the user to change the password, click User cannot change password.
- Click Apply. Repeat steps 2 - 7 if you want to create another user account.
- Click Close when you finish.
To enable users to create accounts for themselves or for other users,
select Allow users to create accounts on the Users/Groups
window.
To set the number of consecutive logon attempts, using an incorrect password,
before locking the user account,
select Number of incorrect password attempts on the Users/Groups window.
- Configure host sessions for users and groups.
- Right-click the user or group for whom you want to create a session and select Sessions.
- In the Configure box, click the display or printer session you want to create.
- On each tab, type or select the required information.
Check Lock to prevent users from changing the associated value.
When this box is checked, users see a field value, but cannot change it.
- Click OK.
- To change the session's runtime properties, such as keyboard mapping, colors, or macros, right-click the session and select Start Session.
Make the changes as a user would customize his session.
You can only change the session's runtime properties if you downloaded the Full administration client. For more information about the Full
administration client, see Administration clients.
Depending on your environment, you may also need to configure additional services in the configuration server. To learn more about
these features, click the following links: