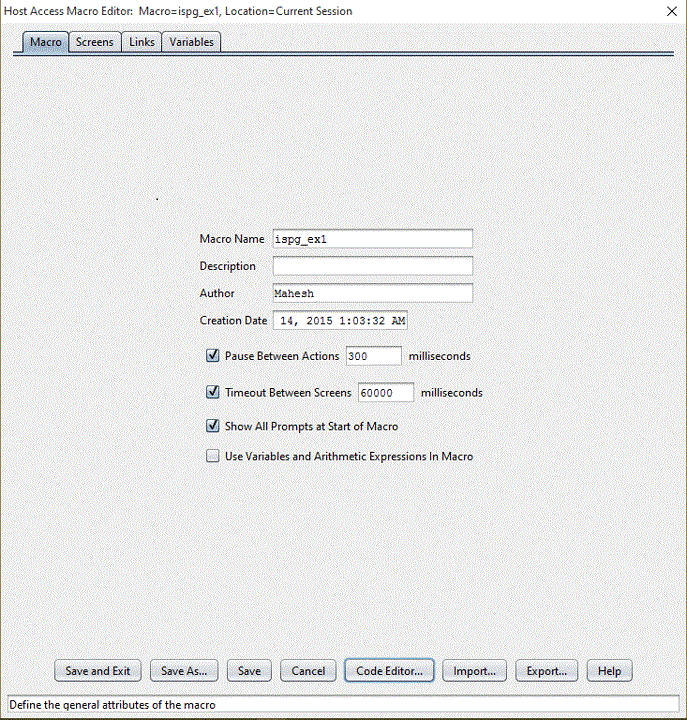
Introduction to the Macro tab
For the purpose of getting you acquainted with the Macro Editor, this section consists of a very simple comparison between the Macro tab of the Macro Editor and the <HAScript> element described in the previous section.
The Macro Editor has four tabs: Macro, Screens, Links, and Variables. The first tab, the Macro tab, corresponds very closely to the <HAScript> element. In fact, the Macro tab is the graphical user interface for some of the information that is stored in the attributes of the begin tag of the <HAScript> element.
Therefore, as the <HAScript> element is the master element of a macro script and contains in its attributes information that applies to the entire macro (such as the macro name), similarly the Macro tab is the first tab of the Macro Editor and provides access to some of the same global information.

- The Macro Name field contains the name that you assign to the macro. This is the same name that you will select when you want to edit the macro or run the macro. Macro names are case-sensitive. For example, ispf_usp is a different name than Ispf_usp, ispf_usP, ISPF_USP, and so on.
- The Use Variables and Arithmetic Expressions In Macro checkbox determines whether the Macro object uses the basic macro format or the advanced macro format for this macro. In the figure above this checkbox is not selected, indicating that the basic macro format will be used (see Choosing a macro format).
<HAScript
     name="ispf_ex1"
     description=" "
     timeout="60000"
     pausetime="300"
     promptall="true"
     author=""
     creationdate=""
     supressclearevents="false"
     usevars="false"
     ignorepauseforenhancedtn="false"
     delayifnotenhancedtn="0">

...

</HAScript>